Welcome to the LOREO Lubot(please refer to your camera instruction manual for changing your lens if you use a Lens in a Cap with your Lubot)
General Instructions
- Remove the protective Lubot Dome, and discard the circular insert. Save the Dome for use in storing your Lubot when not in use.
- Pull out the Lubot Leg assemblies past the first detent into the fully opened 90 degree position. (fig1 #4)
- The Lubot Loupe allows the user a certain amount of diopter adjustment
by screwing the Lens Assembly (fig 1 #2) up or down. This feature is
especially important for eyeglass wearers or when using the Lubot for fixed
focus Macro photography in conjunction with the optional Loreo Lens in a
Cap. "Zero" diopter adjustment is achieved by the following method. Place
the protective dome (fig 2 ) which came with your Lubot snugly on the loupe
with the lens assembly screwed out as high as possible. Turn the dome and
lens assembly together until the bottom edge of the dome just touches the
Lubot body. Your Lubot is now set at "zero." Care should be taken when removing
the Dome after adjustment so as not to disturb the "zero" setting.
- Measuring reticules in millimeters and inches are precision molded
into the bottom edges of the Lubot Leg assemblies. To position these useful
tools, push the leg assembly of the desired reticule to the 45 degree position,
halfway between the fully opened and fully closed positions. The Lubot Leg
will snap into place. Pushing further closes the leg assemblies completely
for storage.
- To use the Lubot Loupe attached to the optional Lens in a Cap
for fixed focus Macro photography, press the Lubot gently into the Accessory
Holder (fig 1 #5) of the Lens in a Cap. The Accessory holder is designed
to hold the Lubot in place with slight spring tension.
- When the Lubot Loupe is attached to the optional Lens in a Cap,
the plane of focus falls exactly at end of the Lubot legs, but only when
the Lubot diopter adjustment is at "zero" (see "1." Above for instructions
on "zeroing" your Lubot.)
- Slight adjustment of the plane of focus can be made by turning
the lens assembly of the Lubot down, lowering the plane of focus outside
the limits of the Lubot legs or turning it up, therefore bringing the
focus up, inside the limits of the Lubot legs.
- Please refer to the detailed instruction sheet which came with
your Loreo Lens in a Cap for information concerning the operation of the
optional Lens in a Cap. Instructions are also available on http://www.loreo.com
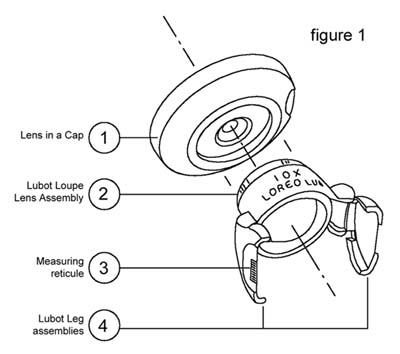 |
1. Optional Lens in a Cap
2. Lubot Lens assembly for diopter and "zero" adjustment.
3. Measuring reticule in Inches and Millimeters
4. Three position Lubot Legs
|
 |
Care and Troubleshooting
- While your Lubot is not waterproof, it is water resistant.
Rain or salt water splashes on the Lubot body should be
harmless. Simply wipe them off with a clean cloth. A soiled lens may be gently
cleaned with lens tissue moistened with lens cleaning fluid or by breathing
on the lens surface. Never put liquid lens cleaner directly onto any lens.
Do not wipe with a dry tissue as it may scratch the lens surface.
- If
you use the Lens in a Cap with a Lubot for taking ultra-macro photographs
take care not to knock the Lubot off its mount while adjusting the camera.
- When a Lubot is attached to the Lens in a Cap do not disengage
it by twisting it. Twisting it too far may result in tightening the eyepiece
diopter so as to make it difficult to loosen.
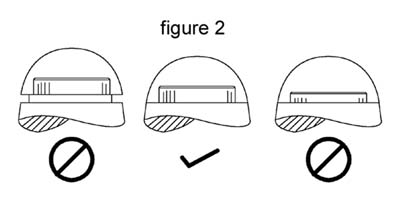
- If
you over-screw the eyepiece upwards (fig. 2 left) it can be loosened by turning
it clockwise while facing upwards. The eyepiece has a right hand thread.
- If you over-screw the eyepiece downwards (fig. 2 right) it can be loosened by turning it counter-clockwise while facing upwards.
- - - - -
Return to the Loreo Homepage.
E-mail: info@loreo.com
|